|
 Find Find
Das Kommando find(1) ist eines der unter UNIX am häufigsten
benutzten Utilities. Es durchsucht das Filesystem, ausgehend von einem Startpunkt,
rekursiv nach Filenamen
Directories in Filesystem auflisten
find . -type d -print
Alle Files mit der Endung (.o) in Filesystem löschen
find . -name "*.o" -exec rm -i {} \;
Suchen aller Files die jünger sind als ein Vergleichsfile
find . -newer <vergleichsfile> -print
Löschen aller "core" und "*.BAK" Files
find . (-name core -o -name ’*.BAK’) -exec rm -f {} \;
Suchen aller Files die in den letzten 7 Tagen verändert wurden
find . ! -mtime +7 -print
Suchen aller Files die in den letzten 7 Tagen NICHT verändert
wurden
find . -mtime +7 -print
Suchen aller Files welche "pattern" enthalten
find . -type f -exec grep -l "stdio.h" {} \;
Suchen aller Files welche "pattern" enthalten mit Angabe der Zeile
find . -type f -exec grep "stdio.h" /dev/null {} \;
 Sed Sed
Sed ist ein sehr mächtiges Utility um den Inhalt eines Files
«im Hintergrund» zu verändern. Das heisst die Datei wird nicht interaktiv
bearbeitet, wie dies bei jedem Editor wie vi, emacs etc. der Fall ist. Sed ist sehr eng
mit dem Gebrauch von regulären Ausdrücken (Regular Expressions) gekoppelt.
Regular Expressions basieren auf dem sogenannten Pattern-Matching Mechanismus. Das File
wird auf ein "Pattern" durchsucht, wird ein Match (Übereinstimmung) gefunden, so
wird die Zeile gemäss den sed-Angaben verändert.
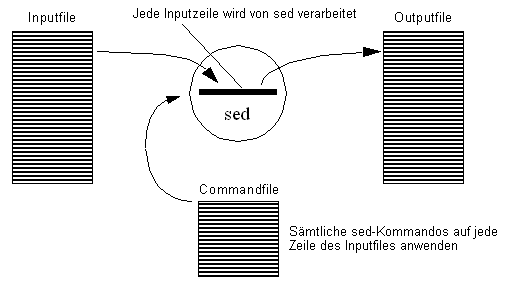
Erste Zeile einer Datei herausschneiden
sed -n "1,1p" /etc/passwd (p = print)
Im File /etc/passwd Einträge /bin/csh durch /bin/ksh ersetzen
sed "s/\/bin\/csh/\/bin\/ksh/g /etc/passwd
Herausschneiden der Login-Namen aus /etc/passwd. Im ganzen File (1,\$)
alles (.*) was rechts von : steht durch nichts (//) ersetzen. Die Adresse (1,\$)
könnte auch weggelassen werden.
sed -e "1,\$s/:.*//" /etc/passwd
Mit ls-Kommando nur reguläre Files anzeigen
ls -l | sed -n "/^-/p"
Mit ls-Kommando nur Subdirectories anzeigen
ls -l | sed -n "/^d/p"
Sämtliche "kurs.." User aus /etc/passwd entfernen
sed "/^kurs.*/d" /etc/passwd
Output von banner in Terminal-Mitte placieren
banner "Hello" | sed -e "s/^/<TAB><TAB>/"
# #
# # ######
# #
####
# # #
# #
# #
####### ##### #
# #
#
# # #
# #
# #
# # #
# #
# #
# # ######
###### ###### ####
Script "killbyname", damit können Processe bequem
mittels Process-Namen gestoppt werden. Beispiel: killbyname xterm, damit werden
alle xterm’s gestoppt. Zuerst werden am Anfang jeder Zeile alle Leerzeichen
entfernt (s/^ *), dann wird alles nach dem ersten Leerzeichen gelöscht (s/ .*//).
Damit verbleiben die PID’s welche dem Kommando kill übergeben werden.
#!/bin/sh
kill -9 ‘ps -ax | grep $1 | sed -e "s/^ *//" | sed -e "s/ .*//"‘
Alle Leerzeilen in File löschen
sed -e ’/^ *$/d’ file1 > file2
sed -e ’s/^$//’ file1 > file2
Blanks am Ende einer Zeile löschen
sed -e ’s/ *$//’ file1 > file2
 Expr Expr
Expr(1) wird oft im Zusammenhang mit der Kommandosubstitution
verwendet. Argumente zu expr werden als Ausdruck verwendet und von expr ausgewertet. Expr
verwendet die folgenden Operatoren:
+ Addition
- Subtraktion
\* Multiplikation
/ Division
% Modulo-Funktion
: Vergleich von Strings
Hochzählen einer Variablen
$index=‘expr $index + 1‘
Filename aus Path extrahieren
$a=$HOME/filex
$expr //$a : ’.*/\(.*\)’
The addition of the // characters eliminates any ambiguity about the
division operator and simplifies the whole expression.
Länge eines Strings bestimmen
$expr $HOME : ’.*’
 Comm Comm
Comm wird benutzt um gemeinsame Zeilen in zwei verschiedenen Files
aufzufinden.
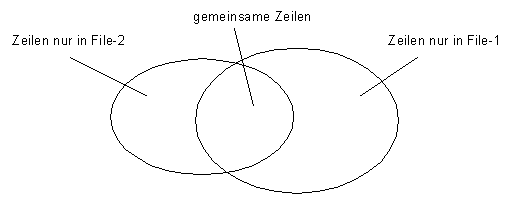
$ comm file-1 file-2
Zeile nur in file-1
Zeile in beiden Files
Zeile nur in
file-2
Zeilen, welche nur im file-1 enthalten sind, stehen in der ersten
Spalte, Zeilen welche in beiden Files vorhanden sind stehen in der mittleren Spalte und
Zeilen welche nur im file-2 vorhanden stehen in der dritten Spalte.
 Diff Diff
Oft interessiert nicht der gemeinsame Fileinhalt, sonden der
unterschiedliche. Mit diff können alle Arten von Files verglichen werden, mit
Ausnahme von Directories. Unterschiede werden mit einem «<» bzw.
«>» gekennzeichnet.
< kennzeichnet das erste File (linkes Argument)
> kennzeichnet das zweite File (rechtes Argument)
Um eine Übereinstimmung zu erzielen werden zur Hilfe drei Flags angegeben:
a: Addiere die folgende Zeile(n) zum File
c: Ändere die folgenden Zeile(n) im File
d: Lösche die folgenden Zeilen(n) im File
Beispiel:
$ diff old.c new.c
10c10
< getenv()
---
> getpwnam()
Ändere in old.c die Linie 10 von "getenv()" auf "getpwnam()" um eine
Übereinstimmung mit new.c zu erhalten.
27a28
> /* -------- */
Füge in old.c auf der Linie 27, die Zeile /* -------- */ ein, welche sich in new.c
auf der Linie 28 befindet, um eine Übereinstimmung zu erreichen.
 Sort Sort
Sort sortiert eine Datei alphanumerisch oder numerisch unter
Berücksichtigung des länderspezifischen Zeichensatzes (Vergleich mit
Zeichensatz = collate). Standardmässig wird der ASCII-Zeichensatz verwendet. Wird
das UNIX-System in der länderspezifischen Version betrieben (NLS-Zusatz), so wird
der entsprechende Zeichensatz gewählt. Sort wird häufig auf tabellenartige
Files angewendet. Die Sortierung erfolgt dabei grundsätzlich auf der ersten
Spalte.

Beispiele
$ sort /etc/passwd Alphanumerisch nach Login-Namen sortieren
$ sort -r /etc/passwd Reverse sortieren nach Login-Namen
$ ls -l | sort -n +3 ls -l numerisch nach der Filegrösse sortieren
 Cut Cut
Mit cut können Spalten aus einem tabellenorientierten File
herausgeschnitten werden. Im Gegensatz zu sort beginnt die erste Spalte mit "1".
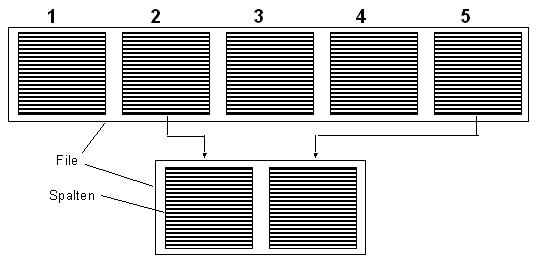
Login-Name und wirklicher User Name einander gegenüberstellen
$ cut -d: -f1,5 /etc/passwd
Ab Zeichenposition 45 herausschneiden
$ls -l | cut -c45-
 Paste Paste
Paste stellt das Gegenteil von cut dar. Einzelne tabellenorientierte
Files können zusammengesetzt werden:
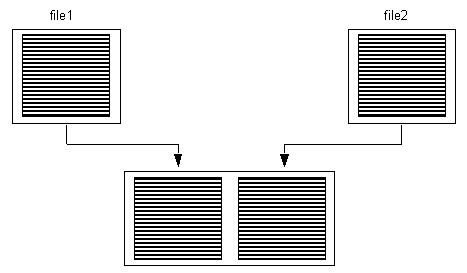
Paste vin zwei Files
$ paste file1 file2
Output von ls /bin 3-Spaltig darstellen. Die drei "-" bedeuten
«read from standard input»
$ ls /bin | past - - -
 Grep Grep
Das Utility grep durchsucht ein File auf einen String. Wird der String
gefunden, so wird die gesamte Zeile des Files auf den Standard Output ausgegeben. Grep
wird sehr oft mit regulären Ausdrücken (regular Expressions) verwendet. Grep
verfügt über einige sehr nützliche Optionen:
-v Display all lines expect those containing pattern.
-c Report only the number of matching lines.
-l List only the names of files containing pattern.
-n Precede each line by the line number in the source file.
Bestimmte Linien aus File entfernen
$ ps -ax | grep -v "xterm"
Suchen aller Files welche "pattern" enthalten
$ find . -type f -exec grep -l "stdio.h" {} \;
Zeilen mit Nummern versehen
$ cat source.c | grep -n ".*"
Suchen eines Files im gesamten Filesystem
$ ls -lR | grep "file"
 Split
Split
How to split files or standard output
into smaller pieces ?
If you want to export the whole oracle
database, or create a TAR archive of one of your filesystem, you may reach a filesize
which is bigger than 2 GB. On some unix filesystems this is the maximal size for one
single file. Or you want to distribute your software release over the internet, then you
usually create a TAR file which can be downloaded. For your customers it may be helpful
to download several small chunks than one huge file. To accomplish these tasks you need
split and often a named pipe.
-
Create a named pipe
mknod tar_pipe p
-
Write to the named pipe as the
first process
tar cvf tar_pipe <tar_directory>
&
-
Read from the named pipe as the
second process
split -b 100k tar_pipe tar_split_
Now you have several files
-rw-r--r-- 1 root root 102400 Apr 24 12:10 tar_split_aa
-rw-r--r-- 1 root root 102400 Apr 24 12:10 tar_split_ab
-rw-r--r-- 1 root root 102400 Apr 24 12:10 tar_split_ac
-rw-r--r-- 1 root root 102400 Apr 24 12:10 tar_split_ad
-rw-r--r-- 1 root root 102400 Apr 24 12:10 tar_split_ae
-rw-r--r-- 1 root root 102400 Apr 24 12:10 tar_split_af
-rw-r--r-- 1 root root 102400 Apr 24 12:10 tar_split_ag
-rw-r--r-- 1 root root 102400 Apr 24 12:10 tar_split_ah
-rw-r--r-- 1 root root 102400 Apr 24 12:10 tar_split_ai
-rw-r--r-- 1 root root 102400 Apr 24 12:10 tar_split_aj
-rw-r--r-- 1 root root 102400 Apr 24 12:10 tar_split_ak
-
Concatenate the files and recreate
tar_directory
cat tar_split_* | tar xvf -
-
Create a named pipe
mknod export_pipe p
-
Read from the named pipe as the
first process
split -b 100k export_pipe full_export_ &
-
Export to the named pipe
exp userid=system/... full=y file=export_pipe
rm export_pipe
-
Import the database again
mknod import_pipe p
cat full_export_* > import_pipe &
imp userid=system/... full=y file=import_pipe
rm import_pipe
 Tee Tee
Tee ermöglicht es eine Pipe an einem bestimmten Ort "anzuzapfen"
und den Standard Output in ein File zu lenken. Damit kann beispielsweise eine Liste der
gesicherten Files bei der Datensicherung mittels cpio erstellt werden.
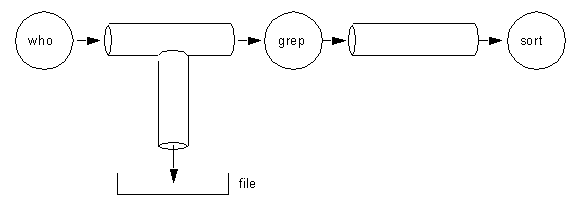
$ who | tee file | grep "pattern" | sort
$ find . -print | tee backuplist | cpio -ocB > /dev/rst0
 Xargs
Xargs
The Unix Manual says the following about the xargs command-line utility: build and execute command lines from
standard input. The fact is that the power of xargs is often overseen.
xargs is a command of the Unix and most Unix-like operating system which eases
passing command output to another command as command line arguments.
It splits its often piped input at whitespaces (or the null character) and calls the
command given as an argument with each element of the splitted input as parameter. If the
parameter list is too long, it calls the program as often as necessary. It often covers
the same functionality as the backquote feature of many shells, but is more flexible and
often also safer, especially if there are blanks or special characters in the input.
Examples
find . -name "*.foo" | xargs grep bar
in practice does the same as
grep bar `find . -name "*.foo"`
but will work even if there are so many files to search that they will not all fit on
a single command line. It searches in all files in the current directory and its
subdirectories which end in .foo for occurrences of the
string bar.
find . -name "*.foo" -print0 | xargs -0 grep bar
does the same thing, but uses GNU specific extensions to find and xargs to separate filenames using the null character; this
will work even if there are whitespace characters, including newlines, in the
filenames.
To accomplish this task we use find with the -exec
option. One of the biggest limitations of the -exec
option is that it can only run the specified command on one file at a time. The
xargs command solves this problem by enabling users to
run a single command on many files at one time. In general, it is much faster to run a
single command on may files, because this cuts down on the number of commands that need
to be started.
Solution without xargs (Takes about 50 secs)
find . -name "*sql" -exec grep -l 'SELECT' '{}' ';' |
wc -l
Solution with xargs (Takes about 25 secs)
find . -name "*sql" | xargs grep -l 'SELECT' | wc
-l
When you have a number of files containing spaces, parentheses, and other "forbidden"
characters, dealing with them can be daunting. What if we want to do a massive
transformation (say, renaming a bunch of mp3s to include an album name) Take a look at
this:
$ ls -l
Masters - 01 - Grounding.mp3
Masters - 02 - Hello Shaker.mp3
Masters - 03 - Harry Potter.mp3
Masters - 04 - Gambling.mp3
Masters - 05 - Darling (Remix).mp3
Masters - 06 - Alpha Pt. 2.mp3
Masters - 07 - Aranger.mp3
Masters - 08 - Spider Man.mp3
What you want is:
Masters - NewYork - 01 -
Grounding.mp3
Masters - NewYork - 02 - Hello Shaker.mp3
Masters - NewYork - 03 - Harry Potter.mp3
Masters - NewYork - 04 - Gambling.mp3
Masters - NewYork - 05 - Darling (Remix).mp3
Masters - NewYork - 06 - Alpha Pt. 2.mp3
Masters - NewYork - 07 - Aranger.mp3
Masters - NewYork - 08 - Spider Man.mp3
When attempting to manipulate many files at once, things get tricky.
Many system utilities break on whitespace (yielding many more chunks than you intended)
and will completely fall apart if you throw a ) or a
{ at them. What we need is a delimiter that is
guaranteed never to show up in a filename, and break on that instead.
Fortunately, the xargs utility can break on NULL characters
!
export VAR="New York"
for x in *
do
    echo -n $x
    echo -ne '\000'
    echo -n `echo $x|cut -f 1 -d '-'`
    echo -n " - $VAR - "
    echo -n `echo $x|cut -f 2- -d '-'`
    echo -ne '\000'
done | xargs -0 -n2 mv
We're actually doing two tricky things here. First, we're building a list consisting
of the original filename followed by the name to which we'd like to mv it,
separated by NULL characters, for all files in the current directory. We then feed that
entire list to an xargs with two switches: -0 tells it to break on NULLs (instead of newlines or whitespace),
and -n2 tells it to take two arguments at a time on each
pass, and feed them to our command (mv).
In the early days of UNIX, it was easy to overflow the command-line buffer, causing a
"Too many arguments" failure. Finding a large number of files and piping them to another
command was enough to cause the failure.
pr -n 'find . -type f -mtime -1 -print' | lpr
will potentially overflow the command line given enough files. This command provides a
list of all the files edited today to pr, and pipes pr's output to the printer. We can
solve this problem with xargs:
find . -type f -mtime -1 -print | xargs pr -n | lp
With no options, xargs reads standard input, but only writes enough arguments to
standard output as to not overflow the command-line buffer. Thus, if needed, xargs forces
multiple executions of pr -n | lp.
While xargs controls overflowing the command-line buffer, the command xargs services
may overflow:
find ./ -type f -print | xargs -i mv -f {} ./newdir
Limit the number of files sent to mv at a time by using the xargs -l option.The following command sets a limit of 56
files at time, which mv receives:
find ./ -type f -print | xargs -l56 -i mv -f {} ./newdir
The modern UNIX OS seems to have solved the problem of the find command
overflowing the command-line buffer. However, using the find -exec command is
still troublesome. It's better to do this:
The find-xargs command combination is a powerful tool. The following example
finds the unique owners of all the files in the /bin directory:
# all on one line
find /bin -type f -follow | xargs ls -al |
awk ' NF==9 { print $3 } '| sort -u
If /bin is a soft link, as it is with Solaris, the
-follow option forces find to follow the link. The xargs command feeds the ls -al
command, which pipes to awk. If the output of the ls -al command is 9 fields, print field
3 -- the file owner. Sorting the awk output and piping to the uniq command ensures unique
owners.
You can use xargs options to build extremely powerful commands. Expanding the
xargs/rm example, let's assume the requirement exists to echo each file to standard
output as it deletes:
# all on one line
find . -type f
-name "*.txt" |
xargs -i ksh -c "echo deleting {}; rm {}"
The xargs -i option replaces instances of {} in a command (i.e., echo and rm are
commands).
Conversely, instead of using the -i option with {}, the xargs -I option replaces
instances of a string. The above command can be written as:
# all on one line
find . -type f -name "*.txt" |
xargs -I {} ksh -c "echo deleting {}; rm {}"
In addition to serving the find command, xargs can be a slave to other
commands. Suppose the requirement is to group the output of UNIX commands on one line.
Executing:
logname; date
displays the logname and date on two separate lines. Placing commands in parentheses
and piping to xargs places the output of both commands on one line:
(logname; date) | xargs
Executing the following command places all the file names in the current directory on
one line, and redirects to file "file.ls":
Use the xargs number of arguments option, -n, to display the contents of "file.ls" to
standard output, one name per line:
cat file.ls | xargs -n1
In the current directory, use the xargs -p option to prompt the user to remove
each file individually:
ls | xargs -p -n1 rm
Without the -n option, the user is prompted to delete all the files in the
current directory.
Concatenate the contents of all the files whose names are contained in file:
xargs cat < file > file.contents
into file.contents.
Conclusion
When should you use xargs? When the output of a command is the command-line options of
another command, use xargs in conjunction with pipes. When the output of a command is the
input of another command, use pipes.
 Tar, SSH Tar, SSH
Shuffling files between servers is simple with
scp:
scp some-archive.tgz
rhost:/usr/local
Or even copying many files at once:
scp rhost:/usr/local/etc/* .
But scp isn't designed to traverse subdirectories
and preserve ownership and permissions. Fortunately, tar
is one of the very early (and IMHO, most brilliant) design decisions in ssh to make it
behave exactly as any other standard Unix command. When it is used to execute commands
without an interactive login session, ssh simply accepts data on STDIN and prints the
results to STDOUT. Think of any pipeline involving ssh as an easy portal to the machine
you're connecting to. For example, suppose you want to backup all of the home directories
on one server to an archive on another:
tar zcvf - /home | ssh rhost "cat >
homes.tgz"
Or even write a compressed archive directly to a
tape drive on the remote machine:
tar zcvf - /home | ssh rhost "cat >
/dev/tape"
Suppose you wanted to just make a copy of a
directory structure from one machine directly into the filesystem of another. In this
example, we have a working Apache on the local machine but a broken copy on the remote
side. Let's get the two in sync:
cd /usr/local
tar zcf - apache/ \
| ssh rhost \
"cd /usr/local; mv apache apache.bak; tar zpxvf -"
This moves /usr/local/apache/ on rhost to
/usr/local/apache.bak/, then creates an exact copy of /usr/local/apache/ from my
localhost, preserving permissions and the entire directory structure. You can experiment
with using compression on both ends or not (with the z flag to tar), as performance will
depend on the processing speed of both machines, the speed (and utilization) of the
network, and whether you're already using compression in ssh.
Finally, let's assume that you have a large archive
on the local machine and want to restore it to the remote side without having to copy it
there first (suppose it's really huge, and you have enough space for the extracted copy,
but not enough for a copy of the archive as well):
ssh rhost "cd /usr/local; tar zpvxf -" \
< really-big-archive.tgz
Or alternately, from the other direction:
ssh rhost "cat really-big-archive.tgz" | tar
zpvxf -
f you encounter problems with archives created or
extracted on the remote end, check to make sure that nothing is written to the terminal
in your ~/.bashrc on the remote machine. If you like to run /usr/games/fortune or some
other program that writes to your terminal, it's a better idea to keep it in
~/.bash_profile or ~/.bash_login than in ~/.bashrc, because you're only interested in
seeing what fortune has to say when there is an actual human being logging in and
definitely not when remote commands are executed as part of a pipeline. You can still set
environment variables or run any other command you like in ~/.bashrc, as long as those
commands are guaranteed never to print anything to STDOUT or STDERR.
Using ssh keys to eliminate the need for passwords
makes slinging around arbitrary chunks of the filesystem even easier (and easily
scriptable in cron, if you're so inclined).
Komprimiertes tar-File eines Directories erstellen Directory
komprimieren
$ tar cvf - directory | compress > directory.tar.Z
Komprimiertes Directory «auspacken»
$ uncompress < directory.tar.Z | tar xvf -
Directories, Filesysteme über Partitions hinweg kopieren
Mit tar:
$ cd /directory
$ tar cf - . | (cd /newdirectory; tar xvlpf -)
Mit find/cpio:
$ cd /directory
$ find . -print | cpio -pdvmu /newdirectory
Directories, Filesysteme netzwerkweit kopieren
Local --> Remote
$ cd <fromdir>; tar cf - <files> | rsh <machine> ’(cd
<todir>; tar xBfp -)’
Local <-- Remote
$ rsh <machine> ’(cd <todir>; tar cf -)’ | tar xBfp -
Datensicherung mit «compress»
Daten sichern:
$ cd /directory
$ find . -print | cpio -ocB | compress > /dev/rst0
$ tar cvfb - 20 . | compress | dd of=/dev/rst0 obs=20b
Daten zurücklesen:
$ cd /newdirectory
$ uncompress < /dev/rst0 | cpio -idcvmB ’pattern’
$ dd if=/dev/rst0 ibs=20b | uncompress | tar xvfb - 20 ’pattern’
Remote Datensicherung
Daten sichern:
$ cd /directory
$ tar cvfb - 20 directory | rsh host dd of=/dev/rst0 obs=20b
Daten zurücklesen:
$ cd /newdirectory
$ rsh -n host dd if=/dev/rst0 ibs=20b | tar xvBfb - 20 ’pattern’
Stdout, stderr in Shell-Script permanent in Logfile
umlenken
Oft möchte man, dass ein Shellscript, das im Hintergrund
abläuft, mögliche Fehlermeldungen in ein Logfile protokolliert. Am einfachsten
wird dazu der Standard-Output und Standard-Error permanent in das Logfile umgelenkt. Dazu
verwendet man die folgende Zeile am Script-Anfang:
exec 1>$HOME/log 2>$HOME/log
 SAR (System
Activity Reports ) SAR (System
Activity Reports )
Must be done as root!
A1. Collection Data
*******************
# Collect sar Output to file, all 60 sec, 10 counts = (during 600 sec).
# Please CHANGE <outfile-n> for each run: e.g. outfile-1, outfile-2 ...
nohup sar -A -o <outfile-n> 60 10 1>/dev/null 2>&1 &
B1. Comparison of CPU utilization (sar -u)
******************************************
# CPU utilization (-u)
* %usr: User time.
* %sys: System time.
* %wio: Waiting for I/O (does not include time when another
process could be schedule to the CPU).
* %idle: Idle time
sar -i 60 -f <outfile-n> -u
B2. Comparison of Buffer activity (sar -b)
******************************************
# Buffer activity (-b)
* bread/s, bwrit/s: Transfer rates (per second) between
system buffers and block devices (such as disks).
* lread/s, lwrit/s: System buffer access rates (per second).
* %rcache, %wcache: Cache hit rates (%).
* pread/s, pwrit/s: Transfer rates between system
buffers and character devices.
sar -i 60 -f <outfile-n> -b
B3. Comparison of Kernel memory allocation (sar -k)
**************************************************
# Kernel memory allocation
(-k)
* sml_mem: Amount of virtual memory available for the
small pool (bytes). (Small requests are less than 256
bytes)
* lg_mem: Amount of virtual memory available for the large
pool (bytes). (512 bytes-4 Kb)
* ovsz_alloc: Memory allocated to oversize requests (bytes).
Oversize requests are dynamically allocated, so there
is no pool. (Oversize requests are larger than 4 Kb)
* alloc: Amount of memory allocated to a pool (bytes).
The total KMA useage is the sum of these columns.
* fail: Number of requests that failed.
sar -i 60 -f <outfile-n> -k
B4. Comparison of System swapping and switching activity (sar
-w)
****************************************************************
# swapping
and switching activity
* swpin/s, swpot/s, bswin/s, bswot/s: Number of LWP transfers
or 512-byte blocks per second.
* pswch/s: Process switches (per second).
sar -i 60 -f <outfile-n> -w
B5. Comparison of Unused memory pages and disk blocks (sar -r)
**************************************************************
# Unused memory pages and disk blocks
* freemem: Pages available for use (Use pagesize to
determine the size of the pages).
* freeswap: Disk blocks available in swap (512-byte blocks).
sar -i 60 -f <outfile-n> -r
B6. Comparison of Paging activities (sar -p)
********************************************
# Paging activities.
* atch/s: Attaches (per second). (This is the number of page
faults that are filled by reclaiming a page already in
memory.)
* pgin/s: Page-in requests (per second) to file systems.
* ppgin/s: Page-ins (per second). (Multiple pages may be
affected by a single request.)
* pflt/s: Page faults from protection errors (per second).
* vflts/s: Address translation page faults (per second).
(This happens when a valid page is not in memory. It
is
comparable to the vmstat-reported page/mf value.)
* slock/s: Faults caused by software lock requests that
require physical I/O (per second).
sar -i 60 -f <outfile-n> -p
 Pipes und Shell Loops Pipes und Shell Loops
Pipes und Shell-Loops können kombiniert werden wie das folgende
Beispiel zeigt. While liest direkt aus der Pipe und wertet jeden Filenamen aus.
ls /bin |
while read name
do
echo $name
done
 Shell Loops und I/O-Redirection Shell Loops und I/O-Redirection
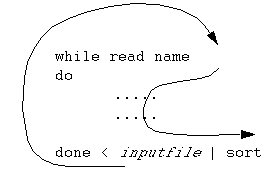
While ist in der Lage aus einem File zu lesen und seinen
Standard-Output auf eine Pipe zu lenken:
 Regular Expressions
 Analyze Apache
Error Log Analyze Apache
Error Log
Show the number of missing files in Apache's error_log. Let's sort it numerically,
with the biggest hits at the top, numbers on the left, and only show the top 20 most
requested "missing" files:
for x in `grep "File does not exist" error_log | awk '{print $13}'
| sort | uniq`
do
grep $x error_log | wc -l | tr -d '\n'
echo " : $x"
done | sort -k 1 -rn | head -20
Mail this report (see how to use a subshell)
( echo "Here's a report of
the top 20 'missing' files in the error_log."
echo " "
for x in `grep "File does not exist" error_log | awk '{print $13}' |
sort | uniq`
do
grep $x error_log | wc -l | tr -d '\n'
echo " : $x"
done | sort -k 1 -rn | head -20
) | mail -s "Missing file report" xyz@xyz.com
574 : /www/akadia/favicon.ico
 46 : /www/akadia/docroot/css/stylesheet.css
 37 : /www/akadia/docroot/css/stylesheet.css,
 27 : /www/akadia/favicon.ico,
  7 : /www/akadia/_vti_bin
  7 : /www/akadia/services/about
  6 : /www/akadia/services/about_blank_virus.htmlÂ
  5 : /www/akadia/_vti_inf.html
  4 : /www/akadia/download/jdbc/outputtempfile08d4.htm
  2 : /www/akadia/services/index.html
 Useful UNIX Utilities to
manipulate fixed length records Useful UNIX Utilities to
manipulate fixed length records
The Unix operating system has a number of utilities that can be very
useful for pre-processing data files to be loaded
with SQL*Loader. Even when the same functionality can be achieved through
SQL*Loader, the utilities described here will be much faster. Data warehousing
applications, in particular, can benefit greatly from these utilities.
This article describes such Unix commands with examples of their
utilization. The Unix version of reference here is Sun Solaris, which is based on Unix
System V Release 4. For syntax details and the full range of options for each command,
consult the man pages in your system and your operating system documentation.
EXAMPLE 1
Let us assume a load with the following SQL*Loader control file:
LOAD DATA
INFILE 'example1.dat'
INTO TABLE emp
(empno POSITION(01:04) INTEGER
EXTERNAL,
ename POSITION(06:14)
CHAR,
job
POSITION(16:24)
CHAR,
mgr
POSITION(26:29)
INTEGER EXTERNAL,
sal
POSITION(31:37)
DECIMAL EXTERNAL,
comm POSITION(39:42)
DECIMAL EXTERNAL,
deptno POSITION(44:45) INTEGER
EXTERNAL)
Here are the contents of data file example1.dat:
7782 CLARK MANAGER 7839 2572.50
0.20 10
7839 KING PRESIDENT 5850.00
10
7654 MARTIN SALESMAN 7698 1894.00 0.15 30
EXAMPLE 2
Let us assume another load with the following control file:
LOAD DATA
INFILE 'example2.dat'
INTO TABLE dept
FIELDS TERMINATED BY ',' OPTIONALLY ENCLOSED BY '"'
(deptno, dname, loc)
Below are the contents of data file example2.dat:
12,RESEARCH,"SARATOGA"
10,"ACCOUNTING",CLEVELAND
13,"FINANCE","BOSTON"
The performance of direct path loads can be significantly improved by
presorting the input data on indexed columns.
Pre-sorting minimizes the demand for temporary segments during the load.
The Unix command to be used for presorting is "sort".
In Example 1, suppose you have added the SORTED INDEXES (empno) clause
to the control file to indicate that fields in the data file are presorted on the EMPNO
column. To do that presorting, you would enter at the Unix prompt:
sort +0 -1 example1.dat > example1.srt
This will sort file example1.dat by its first field (by default fields
are delimited by spaces and tabs) and send the output to file example1.srt:
7654 MARTIN SALESMAN 7698 1894.00 0.15 30
7782 CLARK MANAGER 7839 2572.50 0.20 10
7839 KING PRESIDENT 5850.00
10
In Example 2, if you wanted to sort file example2.dat by column DNAME,
you would enter:
sort -t, -d +1 -2 example2.dat > example2.srt
where "-t," indicates that commas are delimiters, "-d" causes sort to
consider only letters and digits in comparisons, and example2.srt is the output file:
10,"ACCOUNTING",CLEVELAND
13,"FINANCE","BOSTON"
12,RESEARCH,"SARATOGA"
Often, it is necessary to remove one or more fields from all the
records in the data file. The Unix command that does that is "cut". In Example 1,
if you want to eliminate the COMM field altogether from the data file, enter at the Unix
prompt:
cut -c1-38,44- example1.dat > example1.cut
where the "-c" option specifies the character ranges that you want to
extract from each record. The output file example1.cut contains:
7782 CLARK MANAGER 7839 2572.50
10
7839 KING PRESIDENT 5850.00
10
7654 MARTIN SALESMAN 7698 1894.00 30
In Example 2, to eliminate the LOC field from the data file, you would
enter:
cut -f1-2 -d, example2.dat > example2.cut
where "-f1-2" indicates you want to extract the first two fields of
each record and "-d," tells cut to treat comma as a delimiter. The output file
example2.cut would contain:
12,RESEARCH
10,"ACCOUNTING"
13,"FINANCE"
Two Unix commands can be used here: "tr" or "sed". For instance, if you
want to replace all double quotes in the data file in Example 2 by single quotes, you may
enter:
cat example2.dat | tr \" \' > example2.sqt
The piped "cat" is necessary because tr's input source is the standard
input. Single and double quotes are preceded by backslashes because they are
special characters. The output file will be:
12,RESEARCH,'SARATOGA'
10,'ACCOUNTING',CLEVELAND
13,'FINANCE','BOSTON'
Similarly, to substitute colons for commas as delimiters in Example 2,
you may enter:
sed 's/,/:/g' example2.dat >
example2.cln
The output would be:
12:RESEARCH:"SARATOGA"
10:"ACCOUNTING":CLEVELAND
13:"FINANCE":"BOSTON"
Just as for replacing characters, "tr" and "sed" can be used for
eliminating them from the data file. If you want to remove all double quotes from the
data file in Example 2, you may type:
cat example2.dat | tr -d \" > example2.noq
The contents of file example2.dat are piped to the tr process, in which
the "-d" option stands for "delete". The output file example2.noq would look
like:
12,RESEARCH,SARATOGA
10,ACCOUNTING,CLEVELAND
13,FINANCE,BOSTON
An identical result would be obtained by using sed:
sed 's/\"//g' example2.dat > example2.noq
The string in single quotes indicates that double quotes should be
replaced by an empty string globally in the input file. Another interesting usage of tr
would be to squeeze multiple blanks between fields down to a single space character.
That can be achieved by doing:
cat example1.dat | tr -s ' ' ' ' >
example1.sqz
The output file would look like:
7782 CLARK MANAGER 7839 2572.50 0.20 10
7839 KING PRESIDENT 5850.00 10
7654 MARTIN SALESMAN 7698 1894.00 0.15 30
Inserting characters into the data file
A typical situation in which you may need to insert characters into the
datafile would be to convert a fixed position data file into a delimited one. The
data file in Example 1 is a fixed position one. To convert it into a file delimited
by commas, you would enter
cat example1.dat | tr -s ' ' ',' >
example1.dlm
and obtain
7782,CLARK,MANAGER,7839,2572.50,0.20,10
7839,KING,PRESIDENT,5850.00,10
7654,MARTIN,SALESMAN,7698,1894.00,0.15,30
Merging different files into a single data file
Merging can be done by using "paste". This command allows you to
specify a list of files to be merged and the character(s) to be used as
delimiter(s). For instance, to merge the data files in Examples 1 and 2, you may
enter:
paste -d' ' example1.dat example2.dat >
example.mrg
where "-d' '" specifies a blank character as the delimiter between
records being merged and example.mrg is the merged output file:
7782 CLARK MANAGER 7839 2572.50
0.20 10 12,RESEARCH,"SARATOGA"
7839 KING PRESIDENT 5850.00
10 10,"ACCOUNTING",CLEVELAND
7654 MARTIN SALESMAN 7698 1894.00 0.15 30
13,"FINANCE","BOSTON"
The Unix command for this is "uniq". It eliminates or reports
consecutive lines that are identical. Because only adjacent lines are compared, you
may have to use the sort utility before using uniq. In Example1, suppose you
wanted to keep only the first entry with DEPTNO = 10. The Unix command would
be:
uniq +43 example1.dat > example1.unq
The "+43" indicates that the first 43 characters in each record should
be ignored for the comparison. The output file example1.unq would contain:
7782 CLARK MANAGER 7839 2572.50
0.20 10
7654 MARTIN SALESMAN 7698 1894.00 0.15 30
Use "wc". For example:
wc -l example1.dat
3 example1.dat
which indicates that the file contains three lines.
The "dd" Unix command can be used to convert EBCDIC data files to ASCII
and vice-versa. For example:
dd if=example1.ebc cbs=86 conv=ascii >
example1.asc
takes example1.ebc as EBCDIC input file, converts it into ASCII, and
writes the converted output to file example1.asc.
The "dd" and "tr" commands can also be used for converting between
uppercase and lowercase characters. Because Oracle is currently case-sensitive,
this can be useful in many situations. For example, to convert all characters in file
example1.dat from uppercase to lowercase, simply enter
dd if=example1.dat conv=lcase > example1.low
or
cat example1.dat | tr "[A-Z]" "[a-z]" >
example1.low
The contents of output file example1.low will be:
7782 clark manager 7839 2572.50
0.20 10
7839 king president 5850.00
10
7654 martin salesman 7698 1894.00 0.15 30
To convert this file back to uppercase characters, type
dd if=example1.low conv=ucase > example1.dat
or
cat example1.low | tr "[a-z]" "[A-Z]" >
example1.dat
|

![]() Download Download
PDF File with this Tips and more ....
Download Download
PDF File with this Tips and more ....


