![]() How
to setup a Zyxel Elite 2864 Modem ?
How
to setup a Zyxel Elite 2864 Modem ? ![]()
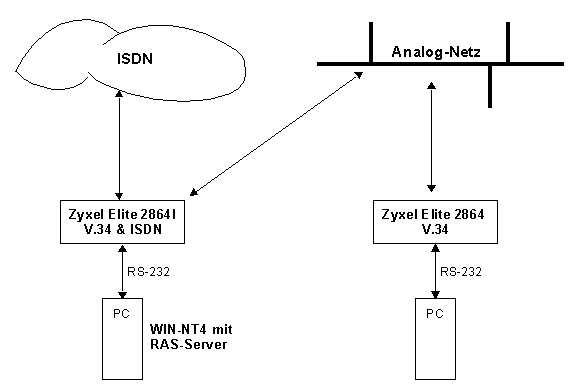
Auf dieser Seite wird das Wichtigste erläutert um ein Modem vom Typ Zyxel Elite 2864/2864i erfolgreich an einer UNIX-Workstation für In- / Out Kommunikation einzusetzen. Bitte verwechseln Sie die Reihe ELITE 2864 nicht mit der Reihe PRESTIGE 2864. Die Elite Modem werden via serielle oder parallele Schnittstelle direkt an einen PC (zB. NT4-Server mit RAS-Server) angeschlossen. Die Prestige Modelle werden direkt an das LAN angeschlossen. Die Elite Modems bieten kein Routing, im Gegensatz zu den Prestige Modellen, dies sind echte Router / Bridges.
Wichtiges zum Zyxel Elite Modem 2864 und 2864i
- Das Modell 2864i kann sowohl analoge wie auch ISDN Calls bedienen, das Modell 2864 kann nur analoge Calls bedienen.
- Die O/A-Taste nie drücken wenn das Modem eingeschaltet wird. Dieser Modus wird nur verwendet um eine neue Firmware zu laden.
- Wenn "Nichts mehr geht", weil man das Modem mit AT-Kommands "verstellt" hat, so drückt man beim Einschalten des Modems die Taste D/V (Data / Voice).
- Blinkt die SQ-LED nach dem Einschalten, so ist das Modem defekt (Interner Selbsttest misslungen).
- LED-AA: Muss aufleuchten für bidirektionalen Betrieb (ATS0=2).
- LED-DTR: Computer sendet das DTR-Signal, das Modem nimmt bei einem Anruf ab. Für bidirektionalen Betrieb muss DTR vom Rechner vorhanden sein. DTR kann dauerhaft auf ON gesetzt werden, wenn der Rechner dies nicht selber setzen kann (AT&D0).
- Es stehen 4 Profiles mit vordefinierten AT-Werten zur Verfügung, das vom Hersteller definierte Profile kann nicht verändert werden.
- Die wichtigsten AT-Kommands sind (Fett heisst: Ungleich Default-Wert)
Terminal Options
Data Format
AT&M0 Asynchroner Modembetrieb
Character Length
AT*C0 10 Bit pro Zeichen
Command Set
AT*I0 AT-Kommandos werden akzeptiert (nicht V.25bis)
DTE Rate
AT&B0 und ATS44.6=1 Die Geschwindigkeit der seriellen Schnittstelle wird der Verbindungsgeschwindigkeit angepasst.
DTR Options
AT&D2 Normaler DTE-Betrieb, Computer sendet das DTE. Kann der Rechner dieses Siganl nicht bereitstellen, so muss AT&D0 gewählt werden (DTE always ON).
DCD Options
AT&C1 Normaler DCD-Betrieb, sobald Rechner einen Carrier vom Modem erhält, so wird DCD gesetzt.
RTS Options
AT&R1 Normaler RTS/CTS Betrieb, Hardware-Flusskontrolle.
DSR Options
AT&S0 Das Modem setzt DSR selbst, normaler Fall.
Command Echo
ATE1 Echo der AT Kommandos
Result Code
ATQ0 Das Modem sendet Ergebniscodes (zB OK) zurück.
Modem Options
Link Option
AT&N0 Automatischer Aufbau mit V.34 -> 2400 (Anpassung)
Quality Action
AT*Q2 Bei schlechter Signalqualität auf nächst niedrigere Geschwindigkeit wechseln und umgekehrt.
RJ11
AT&J0 Stecker nach RJ11 (2-Draht Leitung)
Unlock
AT*L0 Bedienung am Modemkontrollfeld möglich
Line Type AT&L0 Dial-Up (nicht Leased Line) Wählleitungsbetrieb. Error Control
Control Level
AT&K4 V.42(b) + MNP4(5)
Flow Control
CTS/RTS
AT&H3 Hardware Flusskontrolle über die Leitungen RTS/CTS
Wichtiges zum Zyxel-Modem 2864 on SUN Solaros
1. Set Hardware Carrier Detect on eeprom-level
eeprom ttyb-ignore-cd=false
2. Stop System and reboot
3. Konfigure the Port Monitor
#!/bin/ksh
# ---------------------------------------------------------------------
# Install Bidirectional modem using pmadm
# (port monitor administration)
# on SUN Solaris 2.6 (Martin Zahn 28.10.1998)
# ---------------------------------------------------------------------
# List all services on the system
#
pmadm -l
#
# Remove port monitor zsmon and service ttyb
#
pmadm -r -p zsmon -s ttyb
#
# Install port monitor zsmon and service ttyb
#
# pmadm options:
#
# -a Add port monitor
# -p zsmon Add zsmon port monitor
# -s ttyb Add ttyb service
# -i root Root is the owner of the entry
# -fu Create utmp directory for the service
# -v `ttyadm -V` Add version
#
# ttyadm options:
#
# -T vt100 Set the terminal type, The TERM environment
# variable will be set to vt100.
# -b Bidirectional modem (very important !)
# -d /dev/term/b Full pathname of the device file for the TTY port.
# -l 38400 Specify which ttylabel in the /etc/ttydefs
# file to use as the starting point when
# searching for the proper baud rate.
# -m modules Specify a list of pushable STREAMS modules.
# -p prompt Login prompt
# -s service Start login service on this port
# -S y|n Set the software carrier value. y will turn
# software carrier on. n will turn software
# carrier off (Set it off for modems).
# ---------------------------------------------------------------------
$ pmadm -a -p zsmon -s ttyb -i root -fu -v `ttyadm -V` -m \
"`ttyadm -T vt100 -b -d /dev/term/b -l 9600 -m \
ldterm,ttcompat -p 'Akadia AG (quorum) login: ' \
-s /usr/bin/login -S n`"$ pmadm -l
$ sacadm -l
4. Check /etc/remote File for the following entry
cuab:dv=/dev/cua/b:br#9600
5. If using the Port for UUCP, check /etc/uucp/Devices for the following entry
# ---Standard modem line
ACU cua/b - 9600 hayes
# ---A direct line so 'cu -lcua/b' will work
Direct cua/b - 9600 direct
6. Set Modem to Dial-In/Out
cu -lcua/b
Connected
at
OK
atz0 # Modem zurücksetzen und Profile 0 laden
at&b0s0=2s44.6=1&w0 # AT's definieren und in Profile 0 speichern
OK
at&v0 # Anzeige von Profile 0
~.
Disconnected